
iCloud and Photo Sharing: This Changes Everything

While it’s easy to snap lots of photos on vacation, your family and friends are just being polite when you bomb them with the entire collection. A greatest hits or best of is always the right choice!
With iCloud®, it’s now easy to create a shared album and to invite other iCloud users to subscribe to it. This makes it especially handy for viewing on an iOS device or Apple TV®. It’s also easy to create a public web page of photos that anyone can see, even if they don’t use any Apple® devices.
Here’s how:
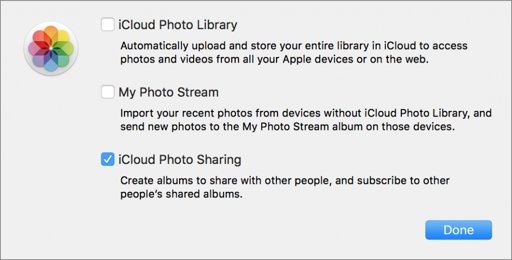
• On a Mac® and macOS®, open System Preferences > iCloud, click the Options button next to Photos®, select iCloud Photo Sharing, and click the Done button.
• On an iPhone® or iPad® and iOS, go to Settings > Photos & Camera, scroll down if needed, and turn on the iCloud Photo Sharing (not iCloud Photo Library) switch.
Then follow these steps on either a MacOS or iOS device:
• In Photos, select some photos or videos. In iOS, that involves tapping Select before tapping the items to select; on the Mac, Command-click the items you want or drag a selection rectangle around them.
• Hit the Share button and select iCloud Photo Sharing.
• On the Mac, elect an existing album, or create a new shared album. In iOS, tap Shared Album to see the New Shared Album command.
• For a new album, create an album name, enter the names or email addresses of any iCloud users with whom you want to share the album, and add an optional comment. On the Mac, click Create; in iOS, tap Post.

To add more photos, it is easiest to start with the shared album:
• In Photos for iOS, if necessary, back out of the view until you see the Shared button at the bottom of the screen. Tap Shared and then the name of shared album. Then tap the + button in the bottom-right corner of the photo grid, select the items to add, tap Done, enter an optional comment, and tap Post.
• In Photos for the Mac, just drag photos into the shared album in the sidebar, under Shared. Or select the shared album in the Shared category, click “Add photos and videos” (near the upper right), select the items to add, and click the Add button.
It's easy to tweak the options for your shared album or to create a public web page. The process is similar in both operating systems:
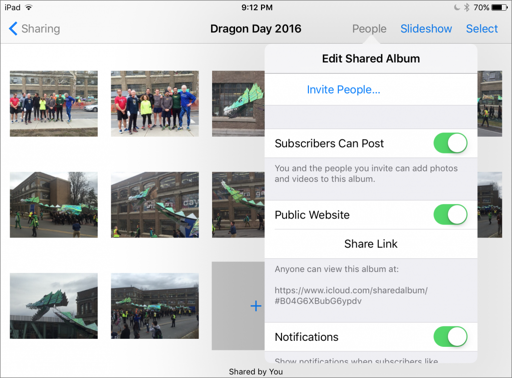
• In Photos for iOS, tap Shared at the bottom of the screen and select the shared album. Tap People to bring up a screen where you can share the album with more people, control whether subscribers can post their own photos, create a public web page, enable notifications and delete the album entirely. To share the URL to the public web page, tap Share Link and select a sharing method.
• In Photos for the Mac, select the shared album in the sidebar and then click the People button in the toolbar. From the popover that appears, you can do the same things as in iOS, although sharing the link is best done by either clicking it to visit it in a web browser and copying from there … or Control-clicking it in Photos and choosing Copy Link from the contextual menu.
iCloud makes sharing albums a breeze once you know the drill. And your family and friends will really appreciate the energy you invest in the process.
Nobody knows the tips and tricks of the macOS and iOS like CranstonIT. Contact us today for a comprehensive consultation on your entire Apple IT landscape.

• On an iPhone® or iPad® and iOS, go to Settings > Photos & Camera, scroll down if needed, and turn on the iCloud Photo Sharing (not iCloud Photo Library) switch.
Then follow these steps on either a MacOS or iOS device:
• In Photos, select some photos or videos. In iOS, that involves tapping Select before tapping the items to select; on the Mac, Command-click the items you want or drag a selection rectangle around them.
• Hit the Share
• On the Mac, elect an existing album, or create a new shared album. In iOS, tap Shared Album to see the New Shared Album command.
• For a new album, create an album name, enter the names or email addresses of any iCloud users with whom you want to share the album, and add an optional comment. On the Mac, click Create; in iOS, tap Post.

To add more photos, it is easiest to start with the shared album:
• In Photos for iOS, if necessary, back out of the view until you see the Shared button at the bottom of the screen. Tap Shared and then the name of shared album. Then tap the + button in the bottom-right corner of the photo grid, select the items to add, tap Done, enter an optional comment, and tap Post.
• In Photos for the Mac, just drag photos into the shared album in the sidebar, under Shared. Or select the shared album in the Shared category, click “Add photos and videos” (near the upper right), select the items to add, and click the Add button.
It's easy to tweak the options for your shared album or to create a public web page. The process is similar in both operating systems:
• In Photos for iOS, tap Shared at the bottom of the screen and select the shared album. Tap People to bring up a screen where you can share the album with more people, control whether subscribers can post their own photos, create a public web page, enable notifications and delete the album entirely. To share the URL to the public web page, tap Share Link and select a sharing method.

• In Photos for the Mac, select the shared album in the sidebar and then click the People
iCloud makes sharing albums a breeze once you know the drill. And your family and friends will really appreciate the energy you invest in the process.
Nobody knows the tips and tricks of the macOS and iOS like CranstonIT. Contact us today for a comprehensive consultation on your entire Apple IT landscape.